Identification of the 1912-1920 2¢

Click a stamp to proceed

For a guide on how to identify perforations, watermark and printing type, please see below.

Perf 8½

Perf 10

Perf 11

Perf 11 x 10

Perf 12

Perf 12x10

Imperforate

Identifying by Type

Type I

Type Ia (as type I plus these differences)

Type II

Type III

Type IV

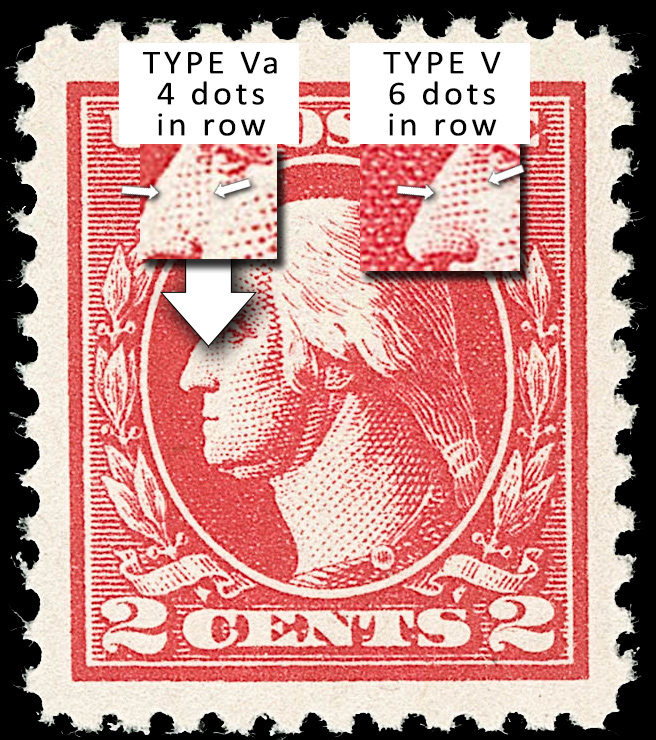
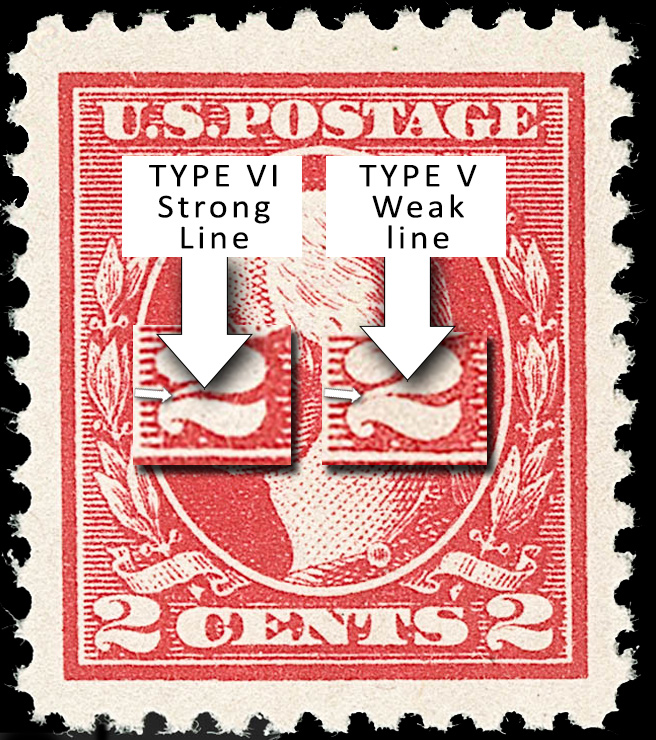
Type V

Type Va (as type V plus these differences)

Type VI

Type VII

Identifying by Feature

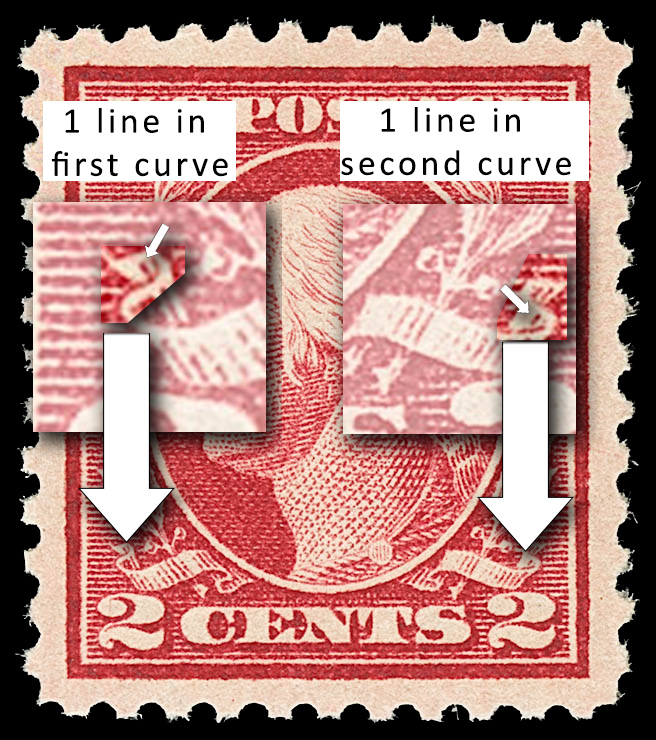
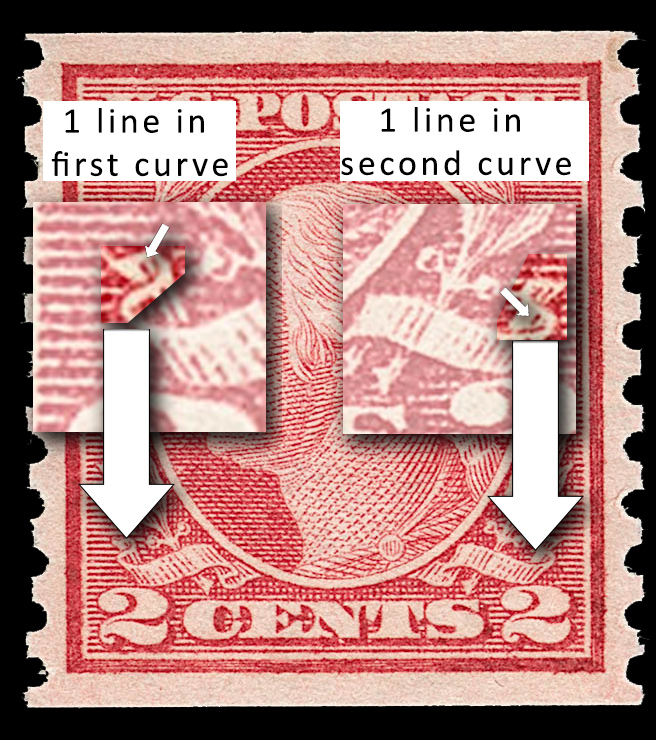
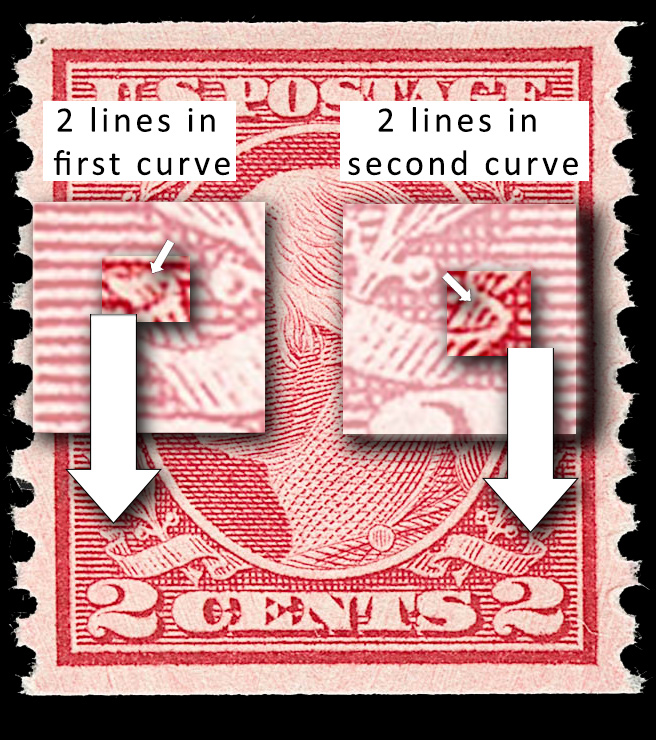
THE RIBBONS

THE LEFT RIBBON'S DISTINGUISHING FEATURE

TYPE I, Ia and II
There is but a single shading line in the top fold of the ribbon at the left.
TYPE III
There are two shading lines in the top fold of the ribbon at the left.

THE RIGHT RIBBON'S DISTINGUISHING FEATURE

TYPE I, Ia and II
There is but a single shading line in the bottom fold of the ribbon at the right.
TYPE III
There are two shading lines in the bottom fold of the ribbon at the right

TYPE I and Ia
The first shading line after the first ribbon fold of the right ribbon often appears as a single, unbroken line. At times there maybe one or two indistinct breaks. The bottom third of the line often appears stronger
TYPE II and III
The first shading line after the first ribbon fold of the right ribbon usually appears as a series of three dashes

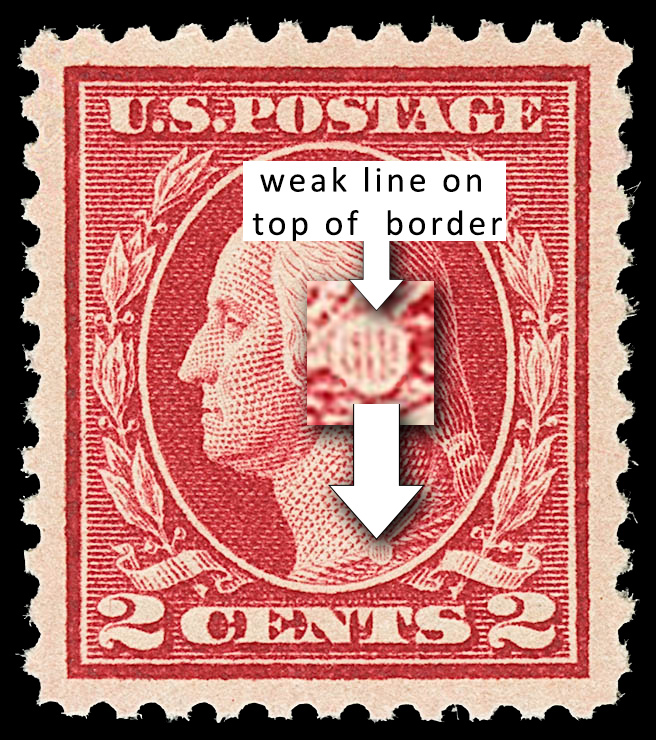
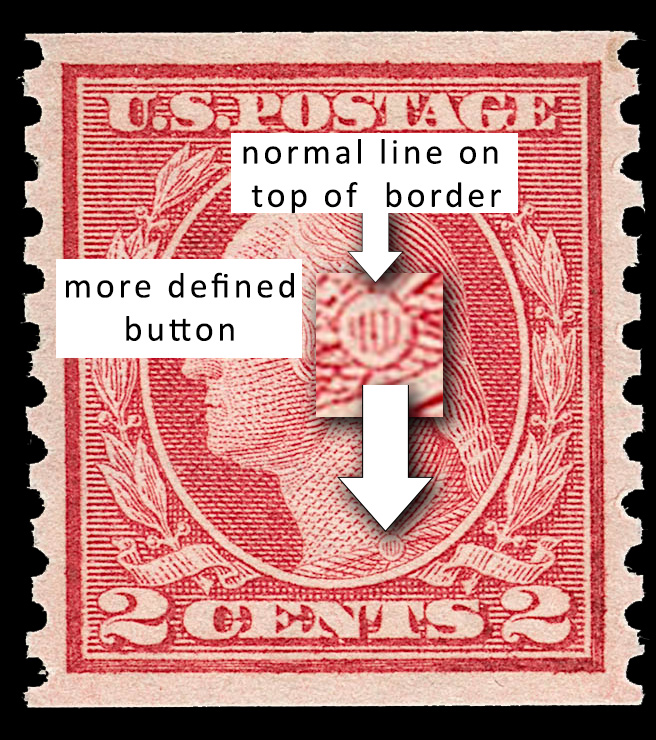
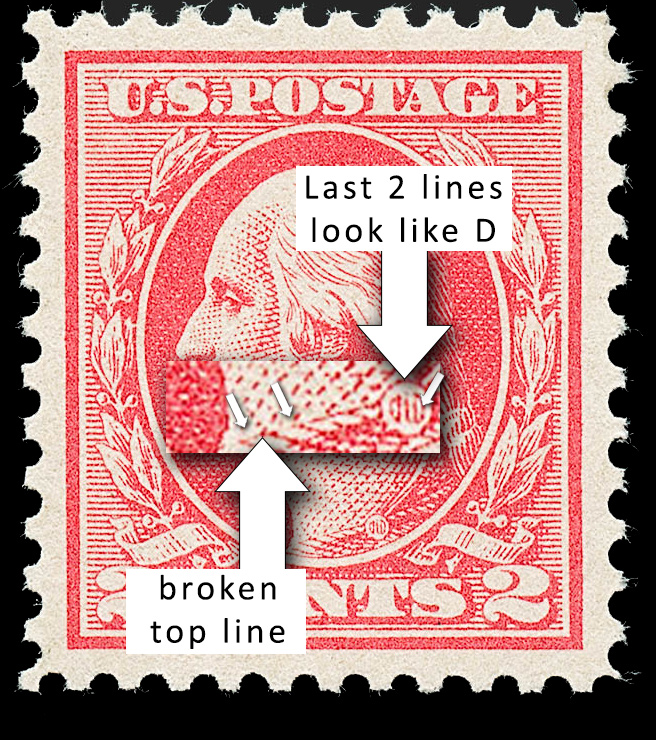
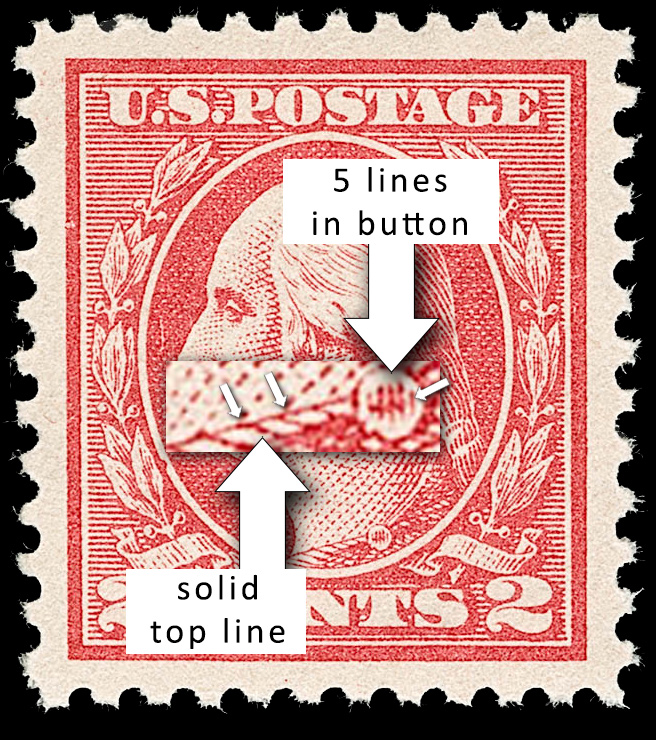
THE BUTTONS

TYPE I
The outline of the toga button is thin and sometimes broken
TYPE Ia
The outline of the toga button is stronger than the other types
TYPE II and III
The outline of the toga button is complete and fairly strong

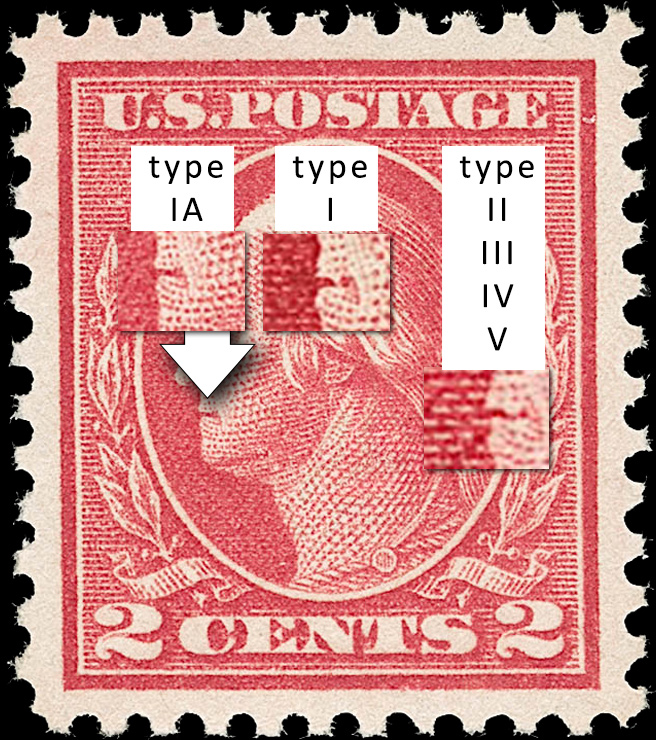
THE HAIR

TYPE I and Ia
The lock of hair on Washington's cheek will show only a faint, often broken, vertical line along its left edge. It will be slightly stronger on type Ia, but not as strong as type II and III
TYPE II
The lock of hair on Washington's cheek will show a distinct vertical line along its left edge, joining at least four of the horizontally engraved lines of the cheek
TYPE III
The lock of hair on Washington's cheek will show a distinct vertical line along its left edge, joining at least five of the horizontally engraved lines of the cheek

TYPE I and Ia
The two lines shading the hair at the top of the ponytail, directly behind the ear are of unequal length
TYPE II
The two lines shading the hair at the top of the ponytail, directly behind the ear are approximately the same length, the bottom one being very slightly shorter
TYPE III
The two lines shading the hair at the top of the ponytail, directly behind the ear are approximately the same length, the top one can be slightly longer

THE MOUTH

TYPE I
The dark line forming the mouth is almost straight or may even curve slightly upward at the corner of the mouth
TYPE Ia
The dark line forming the mouth is a strong straight line with a downward stroke at the corner of the mouth
TYPE II
The dark line forming the mouth is crooked
TYPE III
The dark line forming the right end of the mouth is crooked and it also dips down

THE EARS

TYPE I and Ia
Directly below the ear there are several shading lines which are clearly severed, resulting in the appearance of a thin, white, vertical line
TYPE II
Directly below the ear there are several shading lines which are severed, and the breaks are narrower than those of the type I stamp. Thus the impression is of a thinner and shorter white line, although certainly more pronounced than the type III design.
TYPE III
Directly below the ear the shading lines have been closed up to such a point, that the thin white line visible in type I, Ia and type II designs has all but dissapeared.

Identifying the Watermark

The DOUBLE lined USPS watermark

The SINGLE lined USPS watermark

Between 1895 and 1916 the U.S. government used two different watermarks, double line and single line with the letters "USPS".

By placing the watermark face down on a dark surface or holding it up to bright light you might be able to see the watermark. If you cannot see the watermark it might be a good idea to invest in watermark fluid and a watermark tray. Ronsons lighter fluid works just as well as watermark fluid. Both fluids evaporate quickly.

Pour a little fluid in the tray, lay the stamp face down. In a few seconds the stamp will absorb the fluid and reveal the watermark to you.

As you will see from the illustrations the letters can span several stamps, so on the watermark, for instance, you can see only part of the letter S in one corner and only part the letter P in the other corner.

Flat Plate vs Rotary Press

As the curved plates of the Rotary press made the stamps slightly larger it is relatively easy to discern which stamp is flat plate and which is a rotary press stamp. First select any perf Washington Franklin stamp or the first issue Washington Franklin 1 cent or 2 cent. These are the stamps with the numbers one and two spelt out, instead of numbers being displayed. I chose the latter alternative as shown in the first image above.

Then cut out squares at each corner. As shown in the second image above. Placing the stamp you wish to test under your cut out stamp you can see if the frame lines match. If, as in the last image shown above the frame lines are outside the top stamp in either the top, bottom or sides then you have a rotary stamp. If the lines are in the same place, as shown in the third image, you have a flat plate stamp.

This test works with any value stamp.

The image above left is a perfect example of the reverse of a flat plate stamp. The flecks of green ink on the reverse can be found on flat plate and are very rare on rotary press stamps. The cause of the flecks of green ink is that during the flat plate process the sheets were placed on top of each other before the ink had a chance to dry properly.

The Perforation ID tool

A perforation guide

Probably the most referenced measurement in stamps are the watermark and the perforation size. Perforation gauges as seen above cost just a few dollars and are an invaluable tool in philately. By placing the stamp, as shown above against the various illustrations of perforation gauges you can see which gauge matches the perforation on your stamp. In the example above the stamp is a perf 10 on the top and on the side. It is a good idea to measure both the vertical and horizontal sides as some stamps are perforated 11 x 10, 10 x 11, etc. The top perforation is always quoted first on this site and in stamp catalogues.